| How to Tie Hanging Wire on a Picture Frame
|
 |
Summary
Attach Screw Eyes or D-Rings: Install screw eyes or D-rings to the back of the frame. Place them on either side of the frame, making sure they are level and evenly spaced. These will serve as anchor points for the wire. For larger frames, you might consider using two attachment points on each side of the frame instead of just one. This distributes the weight more evenly and provides better stability.
Check Stability: Ensure that the wire is securely attached to both anchor points. Gently tug on the wire to confirm its stability.
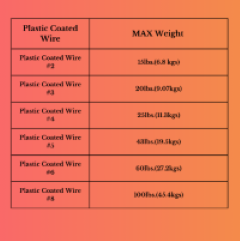
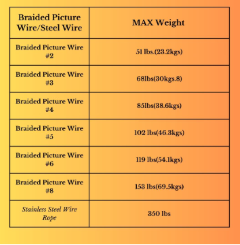
Choose the Right Wire: Select a wire that is strong enough to support the weight of your picture frame. Picture wires are often rated by weight capacity, so choose one that matches or exceeds the weight of your frame. For larger frames, especially those with heavier artwork or mirrors, you may need to use a thicker and stronger picture wire to support the weight. Smaller frames with lighter artwork may not require as robust a wire.
Cut Excess Wire: Use wire cutters to trim any excess wire, leaving a neat and tidy finish.
Hang the Picture: Your picture frame is now ready to be hung on the wall. Use appropriate hanging hardware, such as nails or screws, and make sure they are driven into the wall studs for added stability.
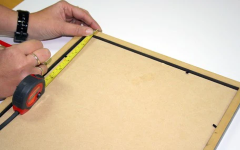
Measure the Wire: Measure and cut the wire to a length slightly longer than the width of the frame. This gives you some extra length to work with when tying the wire. Use a wire with an appropriate thickness for the size and weight of the frame. Thicker wire provides more strength and support for larger frames.
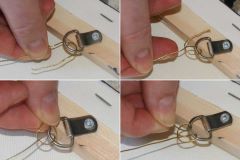
Pull the Wire Across: Pull the wire across the back of the frame to the other screw eye or D-ring. Leave some slack in the wire to allow for adjustments. Thread the wire through the second screw eye or D-ring, leaving a few inches of excess wire. Again, twist the wire around itself to secure it.
Thread the Wire: Thread the wire through one of the screw eyes or D-rings, leaving a few inches of wire sticking out. Twist the wire around itself to secure it.
Twist and Secure: Twist the excess wire around the main length of the wire on both ends. This helps to secure the wire and prevent it from slipping out. When tying the wire to the frame, you may want to use multiple knots or twists for added security on larger frames
Pencil
Picture frame
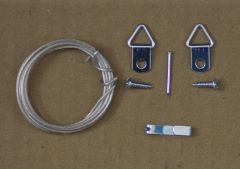
Picture wire
Ruler or measuring tape
Screw eyes / D-rings (appropriate size for your frame and wall type)
Screwdriver or power drill
Wall anchors (if needed)
| 
| 
|
Use a level to ensure your frame hangs straight. Adjust the picture wire as needed until the frame is perfectly level.
Materials Needed:
Step 1: Choose the Right Screw Eyes/D-rings
Step 2: Mark Screw Eye/D-rings Placement
Step 3: Pre-drill Holes
Step 4: Install Screw Eyes/D-rings
Step 5: Attach Picture Wire
Step 6: Level the Frame
Step 7: Install Wall Anchors (if necessary)
| When it comes to displaying your favorite pictures and artwork, the right hanging system can make all the difference. Screw eyes and D-rings are a popular and reliable choice for securely hanging picture frames on your walls. We'll walk you through the process of using screw eyes and D-rings to create a stable and aesthetically pleasing display for your cherished memories.
|
|
| Tying wire on picture frames is a common method used for hanging frames on walls. Here's a step-by-step guide on how to tie wire on picture frames:
|
| Additional Resources |
How to Tie Hanging Wire using Screw eyes/D-rings |
Overview |
 |
Braided Picture Wire/Steel Wire
If you have questions about any of our services or products, don't hesitate to contact us. Our knowledgeable staff is always happy to assist with answers, advice, or suggestions.
If your frame doesn't come with an integrated hanging mechanism, attach picture wire to the screw eyes/D-rings. Securely fasten the wire, ensuring that they can bear the weight of the frame. We will be covering a more in-depth solution to how to attach a wire below.
If you're hanging your frame on drywall, and the frame is heavy, consider using wall anchors for added support. Drill holes for the anchors, insert them, and then screw the screw eyes into the anchors.
KeenART Media
Materials
Measure and mark the positions where you want to place the screw eyes on the top edge of the picture frame. Typically, screw eyes are installed about one-third down from the top of the frame, but you can adjust based on your preferences and the frame's design.
Measuring
Plastic Coated Wire
Remember to take the weight of your picture frame into account when choosing the wire and hanging hardware. If your frame is particularly heavy, consider using multiple anchor points or heavier-duty wire.
Screw the eyes into the pre-drilled holes by turning them clockwise. Use a screwdriver for smaller frames and a power drill for larger or more substantial frames. Ensure that the screw eyes are securely attached but be cautious not to overtighten and damage the frame.
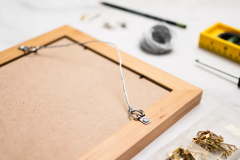
Secured Hanging Wire
Select screw eyes that are appropriate for the weight and size of your picture frame. Screw eyes come in various sizes, so make sure to choose ones that can handle the load of your frame.
To purchase D-ring/Screw Eye materials, click here!
To purchase hanging wire, click here!
To purchase picture frames, click here!
Tying the Wire
Using a screwdriver or power drill, pre-drill small pilot holes at the marked positions on the top edge of the frame. This will make it easier to screw in the eyes and reduce the risk of splitting the wood.
With this step-by-step guide, you can confidently use screw eyes/d-rings to create a secure and visually appealing hanging system for your picture frames. Whether you're arranging a gallery wall or showcasing a single piece, the right hanging hardware ensures your artwork stays safely and stylishly displayed for years to come.
| How to Tie Hanging Wire on a Picture Frame |
 |
|

|


|
USA Giclee On Canvas, Fine Art Printing - Art Scanning & Reproductions - Handmade Oil Paintings - Custom Wood Panels, Metal Picture Framing - Block/Plaque Mountings, Large Format Dry Mounting & Lamination - Art Supplies: Stretcher Bars, Cradled Wood Panels and Artist Canvas - Collages On Canvas - Plexi/Acrylic Face Mounts - Block Acrylics, Fabric Printing, Dye Sublimation - Cityscape Skyline Prints, Resin, Photo Gifts and more...
|
|
© 2002-2025 - KeenART Media Ltd.
|
|
| |
|
