| MEASURING FOR MATS |
 |
|
Once you make the decision to display your framed artwork with a mat, the last thing you want is to come home with an image that is dwarfed or overshadowed by the mat.
The point of a mat is highlight, and keep the viewer's attention on, the art it surrounds. A mat border that is to narrow can end up looking like a stripe, which competes for attention with the art. Alternately, if the mat border is too wide, the eye can get lost in all that blank space and forget to return to the image. That said, sometimes very wide mat borders are a good choice. Very thin mat borders are never a good choice.
If the mat is so important, there must be some guidelines on choosing the best mat size and ensuring the correct measurements, right? Indeed there are; read on to learn more.
|
SUMMARY
When selecting a mat for a framed artwork, you must determine more than just color. This article outlines the process from start to finish, including details on:
- Choosing the best interaction between mat and artwork
- Image Only
- Image and White Space
- Image and Paper Complete
- Calculating the mat size for an existing artwork and frame
- Mat window size
- Frame size
- Mat border/width
- Mat border width selection
- The "ideal" mat width
- Bottom weighted mats
- Double and triple mats
|
| MAT AND ARTWORK INTERACTION
|
 |
There are three basic ways the mat can surround the artwork. The best option, aesthetically, will depend on the qualities of the individual art.
- Image Only: You can choose to have the mat come directly to the edges of your image. In this case, as soon as the image stops, the mat begin. The rest of the blank paper will be hidden behind the mat.
This option generally works best for art with a distinct outside edge, as opposed to an uneven one, or color that fades into the white border. Often a white border will be present around the artwork - especially if it is a print - so having some of that border showing as well as the mat is unnecessary.
- Image and White Space: You may decide on a mat window larger than the exact colored portion of your artwork. This style shows the art as well as the paper-colored space (usually white) surrounding it. Some of the remaining blank paper will be hidden behind the mat.
This option is ideal for artwork without a definite edge, such as pieces that fade out or are deliberately uneven around the corners. A piece with a straight, delineated border in black or another bold color will generally not suit this mat style.
- Image and Paper Complete: Finally, you might want the entire paper visible within the mat window. In this case, the mat opening will be wider than the art and the outlying border. The mat will not conceal any of the page at all.
This option can be chosen for any artwork, though pieces with no defined artwork edges and an uneven paper edge (deckle) are the most visually pleasing. Generally, at least 1/4" of space will be left between the outside edge of the paper and the bevelled lip of the mat.
Note: Except in the case of a floating frame, this display style requires a mounting board behind the artwork, both to mount the paper and to fill the space between outer paper edge and inner mat edge.
|
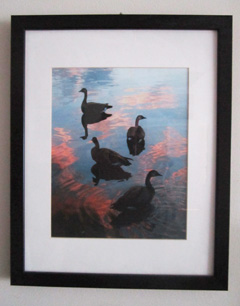
A mat can be a beautiful addition to an artwork
|
| MEASURING FOR A MAT
|
 |
|
With the abundance of affordable custom framing stores, it is highly recommended that you choose a frame to fit your matted image, not a mat to fit a frame. Fitting your mat dimensions to an existing frame can result in an unbalanced display that is not worth the money you saved on a standard-sized frame.
However, sometimes this is unavoidable if you have an artwork that is perfect for a certain frame, or you have limited wall space. In this case, simple measurements are all you need to figure out the mat size you require for your artwork and frame.
Step One: Mat Window Size
The mat window size is equal to the artwork that will be visible in the mat window. This is found by first measuring the artwork. If you wish to show only a certain portion of the art, be sure to measure only this part, instead of the whole artwork.
Once you know the artwork size, subtract 1/2" from each dimension. This will allow the mat to overlap of 1/4" on each side of the artwork, and is important to ensure the art does not shift and fall through the mat. Even if the artwork has a white border around it already, allow for this space. Otherwise, if the art shifts, that white border could become visible in the mat window.
Example: Artwork size = 8" x 10". Mat window size = (8-1/2) x (10-1/2) = 7½ x 9½"
Step Two: Frame Size
Presumably, your frame is at least a few inches larger than the artwork on each side. The best way to determine your frame size is to measure the glass inside the frame. If there is none, ensure you measure from the back of the frame, behind the lip (the recessed area, called the rabbet). Do not measure across the front of the frame.
If the frame size is listed on the frame, it is still a good idea to measure the glass to make sure. The glass measurement should be equal to the recorded frame size. The "frame size" will always be the glass size, not the full dimensions from the front of the frame.
In our example, the frame size is 12" x 14".
Step Three: Determine Mat Border/Width
Now that you have your mat window size and your frame size, all you need to determine is width of the mat border. A diagram (pictured right) is often a helpful way to lay out your current calculations and ensure the final calculation is correct.
The mat border width will be 1/2 of the difference between the frame size and the mat window size. Continuing with the example above:
Horizontal mat border width = 11 (Frame Width) - 7½ (Mat Window Width) = 3.5 ÷ 2 = 1¾
Vertical mat border width = 14 (Frame Length) - 9½ (Mat Window Width) = 4.5 ÷ 2 = 2¼
Therefore, our mat borders must be 1¾" wide above and below the artwork, and 2¼" wide on either side.
Remember the lip of the frame will overlap the mat about 1/4" on each side, so the visible part of the mat will be approximately 1/2" less than your mat border measurement. This is unavoidable, and does not affect your calculations.
Note: If doing all these measurements results in a mat width less than 1" (or less than the "ideal" size suggested in next section), we highly recommend finding a new frame and saving your existing frame for another artwork. Also, since equal-width borders are the most visually pleasing, in the example above the frame is not ideal for the artwork.
|
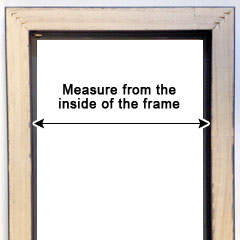
Measure from the back
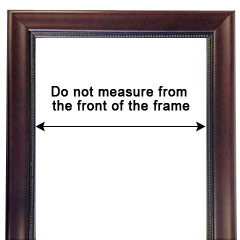
Do not measure from the front
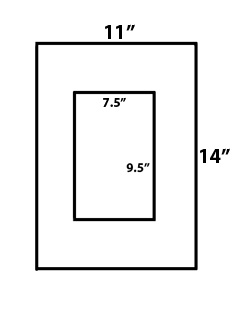
A diagram of the frame and mat window
|
| THE "IDEAL" MAT WIDTH
|
 |
|
As mentioned above, there are inherent problems with both a mat that is too narrow, and one that is too wide. If you are planning to order a custom frame based on the final size of your matted artwork, you will want to be certain your mat is the "right" size for the art.
Some articles suggest that in order to avoid selecting a mat that is too narrow, you add one inch to whatever width you think is correct. Logan Graphic removes this uncertain guesswork with a useful chart that can help those new to matting and framing determine the proper mat width.
It is important to understand that this chart is meant as a guideline only. In the end, mat size is a completely personal choice, and Logan suggests using this chart to determine the minimum mat border, as opposed to the exact.
To use the chart, you must determine the united inches of the artwork (which is approximately equal to the united inches of the mat window). To do this, simply add the width and height of your image in inches; the sum is the united inch measurement.
(Example: An 8"x10" image = 8 + 10 =18 united inches)
UNITED
INCHES |
MAT BORDER
WIDTH |
| 6" or less |
3/4" |
| 7" - 8" |
1 " |
| 9" - 10" |
1-1/2" |
| 11" - 24" |
1-3/4" |
| 25" - 32" |
2" |
| 33" - 36" |
2-1/4" |
|
UNITED
INCHES |
MAT BORDER
WIDTH |
| 37" - 40" |
2-1/2" |
| 41" - 44" |
2-3/4" |
| 45" - 52" |
3" |
| 53" - 58" |
3-1/4" |
| 59" - 64" |
3-1/2" |
| 65" - 68" |
3-3/4" |
|
Bottom Weighting
You may have heard about the traditional practice of "bottom weighting" a mat. This is done by simply making the bottom mat border slightly wider than the rest of the borders.
This method was adopted in the 19th century to combat an optical illusion created by the hanging style. For a period of time, framed art in galleries was hung above eye level, tilted out from the wall so the viewer had to look up to see it. At this angle, an image with equal mat borders had a tendency to look like it was sitting closer to the bottom of the frame. A wider bottom border balanced this uneven appearance.
Today, however, framed art is almost always hung at eye level. Though bottom weighting is no longer necessary, many framers still follow this traditional style. It is also a popular way to fit art into a frame that does not allow for equal mat borders.
("Top centering" is similar to bottom weighting. The top and side mat borders will all be the same size, while the bottom border is slightly wider. This is another way to fit a matted image into a standard frame.)
Double and Triple Mats
Choosing a double or triple mat does not make a difference in your calculations. The top mat width will simply be subtracted from the reveal of the bottom mat, so the mat border width now includes two mats.
However, if you are ordering a mat from KeenART Media online, we will add the "mat width" (mat border width) and the "reveal" together. So if you select a 2" mat width and a 1/4" reveal, your total mat border width will be 2¼", and the frame will be 4½" larger (2¼ x 2) than your artwork size.
|
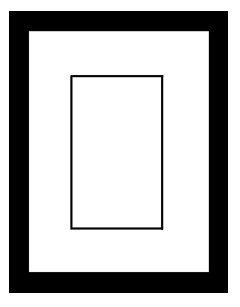
An equal mat border
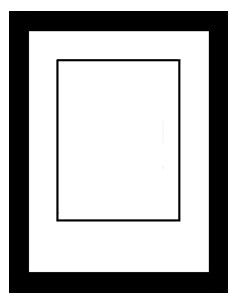
A bottom weighted mat border
|
| If color and measurements are determined with care, mats add beauty and professionalism to your framed artwork. In addition to the pleasing visual effect, the mat creates space between the glass and the artwork, which protects the art from damage should condensation form on the inside of the glass. For more information about mats, be sure to read our article All About Mats.
At KeenART Media, we offer custom picture framing and matting services - we even do some of the math for you. If you wish to order a frame and mat but are unsure about your artwork dimensions, please do not hesitate to contact us. Our knowledgeable staff are always happy to answer any questions you may have about the process.
We also sell uncut matboards in our Product Store if you prefer to cut your own!
|
| PRODUCT ORDER PAGES
|
 |
|
|
 |
Custom Wood Frames:
Our quality framing solutions include a wide range of custom-made wood 7 METAL frames in various styles and sizes.
To start Click here. |
|
 |
Fine Art Paper Printing:
We offer affordable Fine Art Inkjet Printing as a custom service for artists, commercial photographers and anyone else concerned with producing top-quality archival prints.
To start Click here. |
|
Front Side |
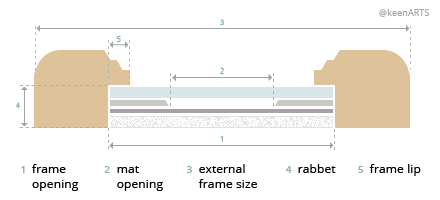
Picture framing terms |
Back Side |
| MatBoard Guide: |
 |
 Single Matboard Sample |
 Double Matboard Sample |
|
Terms:
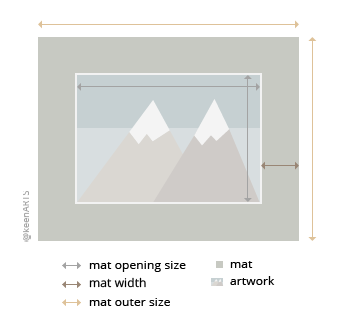
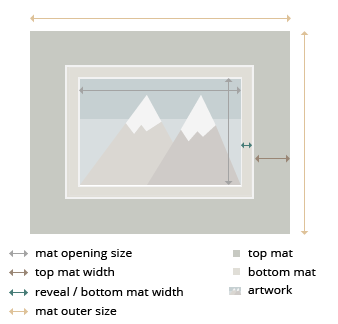
Top Mat: Top layer of a double mat; It has a larger window, which allows a small border of the bottom mat, called the reveal, to be shown.
Bottom Mat: Optional second layer of matboard used in double matting; The window opening of the bottom mat surrounds the artwork.
Reveal: Width of the bottom mat, normally 1/4", 3/8" & 1/2"
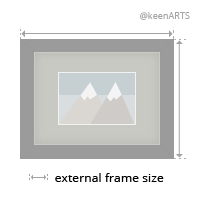
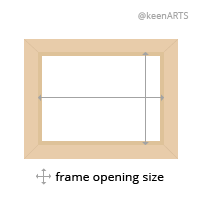
Mat Outer Size: Also known as frame opening size, matches the plexi glass or backing size of the picture frame
Artwork Size: The exact size of the artwork!
Mat Opening Size: Size of the matboard window cut out
|
|
|
Our informative articles on MatBoards:
Choosing the Best Mat Size The article offers helpful tips on selecting the appropriate mat size for your artwork.
Measuring for Mats All about Mat Outer Size, Artwork Size and Mat Opening Size
Choosing Mat Color How to select the best colors of mat fo ryour artwork
All About Mats The article discusses the different materials and attributes of picture framing mats and more!
|
| Matboard FAQs: |
 |
Q1 : Does my artwork need a mat?
Whether or not to add a mat to your image is entirely up to you. If you intend to sell the artwork or pass it down as a family heirloom, an acid-free mat is a good idea to protect the image from the condensation that may occur on the glass. But if you are simply framing family photographs or an art print, the mat is a purely aesthetic option.
Order online:
Custom-cut matboards
Full sheet, 32x40" matboard
Q2 : What color is your whitest white?
We offer many shades of white mat board. Crystal White is our brightest white.
Order online:
Custom-size mats
Full, 32x40" matboards
Q3 : What is backing board?
Backing board is used to back or mount prints inside a frame.It is slightly thinner than a 4-ply matboard. It
Order online: Backing Boards
Q4 : Do you sell full sheets (32 x 40)?
We currently sell full matboard sheets (32x40") in certain colors.
Order online:
Full, 32x40" matboards
Q5 : What is the purpose of a mat?
Matting is the border that surrounds your art within the frame. Visually, the mat boards provide "breathing room" from any distractions on the surrounding wall including the frame. The other usage of Mat is separating the artwork from the plexi or glass.
Q6 : Should I get an acid-free mat or a regular mat?
Acid- and lignin-free mats guarantee no artwork degradation will occur because of the mat for hundreds of years. If you plan to sell your piece or show it in a gallery, a Museum core mat board is advisable. However, if you are simply framing an inexpensive piece or a print to show in your home, you should be fine with a regular mat.
Even our regular mats are treated with calcium carbonate to keep them acid-neutral for 100 years.
Q7 : How do I choose the best color mat?
A colored mat is a great way to enhance or draw out certain sections of your artwork. At the same time, a colored mat can have a detrimental effect if it does not flatter the artwork colors. Try laying different mats on top of your artwork to help you decide. If no color seems to fit, a mat in one of our many shades of white is always a good choice.
Order online:
Custom-size mats
Q8 : How much of my image will the mat cover?
The mat will cover 1/8" to 1/4" on each side of your image. This overlap is essential to ensure your artwork remains behind the mat and does not fall through. We recommend the default overlap of 1/4", but if your artwork has many important details along the edges that you do not want obscured, we can cut the mat to have an 1/8" overlap.
If your image has a white border around it, do not cut this off prior to matting. We can minimize the amount of overlap on the actual image if there is enough space around the edge.
Q9 : What is the difference between regular, conservation, and museum mat boards?
Regular mat boards are made from wood pulp, treated with an acid-neutralizer that minimizes negative reactions between the mat and artwork. They are our least expensive mat board.
Conservation mat boards have a core of acid- and lignin-free cotton, and a facing of wood pulp paper. They protect the artwork from acid burn and degradation for at least 100 years, and have a mid-range cost.
Museum core mat boards are made entirely of cotton rag paper. They are guaranteed to have no adverse reaction with artwork for hundreds of years. Museum mat boards are the most expensive and the best quality.
Q10 : Do you have more mat options than are on your website?
We do carry other options for mat boards, but they need to be ordered in, and this can delay your order. Please contact us if you require a different mat.
Q11 : How wide should my mat be?
The width of the mat is up to the customer, but we can provide some general guidelines.
For average sized artwork (about 11x14" to 30x20"), the common mat width is 2". If you artwork is smaller, you might consider a 1.75 or 1.5" mat. If you artwork is very large, a 3" or 4" mat may be necessary to ensure an aesthetically pleasing ratio.
Please see our article Measuring for Mats for more information.
Q12 : How do I order a mat board with my frame?
When you select the frame size to order, you will see an option to add "mats" to your order. When you select this, you can choose your mat color. The mat width is the thickness on one side, between the frame and the artwork (generally about 2"). If you are selecting two mats, the reveal is the amount of the bottom mat that will show between the artwork and the top mat.
Q13 : Do you carry different thicknesses of mat boards?
We can make your order with 8 ply mat boards in basic colors, however we do not keep them in stock, so ordering them may delay your order by a few days. We offer a wide selection of colors in the regular 4 ply thickness, and a double mat is a good option if you require a thicker division between plexiglass and image.
Q14 : Can I come into your store to choose a matboard?
If you are located in the Vancouver area, you are welcome to stop by our store and go through our mat samples. Unfortunately, we are an online business and do not have storefronts in other locations.
Q15 : Can I get a mat larger than 32x40 inches?
Unfortunately, our mat boards do not come in a larger size than 32 x 40, so we are unable to accommodate oversize mat orders. Have you considered having your artwork printed with a colored border?
Another option for larger artwork is to purchase a linen liner. Because these are custom made like picture frames, you can order larger sizes. Please note, however, that liners are thicker than matboards, and may require a frame with a deeper rabbet.
Order online: Full, 32x40" Matboards
Q16 : What brand are your mat boards?
Our mat boards are made by Peterboro. This Canadian company has been in the paper-making business since 1902, and their products are manufactured in and distributed from Canada.
Q17 : What is the difference between mat, matt, and matte?
Though "mat" is the most widely recognized spelling, all three words mean the same thing: a rigid paper border that divides the image from the glass and the frame.
"Matte" or "matt" may also refer to a smooth, non-reflective finish.
Q18 : How many different matboard colors do you carry?
We stock 50 regular matboard colors, as well as about 30 conservation and 18 museum core colors. However, we are able to order any color you would like. Contact us if you do not see the color you want on the website. Please remember that ordering a mat we do not have in stock will delay your order a few days.
Order online, or view our full selection in stock: Matboards
Q19 : What is the mat offset?
The offset is the amount that your mat is smaller than your image. This slight overlap ensures your artwork will not fall through your mat. However, you do not need to factor this measurement into your calculations - we will automatically cut your matboard 1/8" to 1/4" smaller on each side than your artwork size.
Q20 : What calculations do I need for ordering a mat?
All you need to know is the size of your artwork, and the width of the mat border (usually about 2" on each side). Both these amounts can be entered in our online form when you place your order.
We will do all other calculations for you, such as the mat offset and the total frame size.
Please see our article, Measuring for Mats for more information.
Q21 : What is the mat window?
The mat window, or mat opening, is the space between the two inner edges of the mat - the hole through which your artwork will show. The mat window is generally 1/4" to 1/2" smaller than your artwork vertically and horizontally. This allows for the mat offset, which overlaps your image 1/8" or 1/4" on each side, keeping the art from falling through the mat.
Q22 : Can I order Custom Cut Frame MatBoards?
Yes, to order click here: Custom Cut MatBoards
Q23 : What is the fifference between 4 ply or 8 ply matbaords?
Ply is the thickness of the matboard. The most common thickness used is 4 ply (around 1/16th of an inch) and double thick matboards are 8 ply or roughly 1/8 inch thick. The higher the number, the thicker and more rigid the board. Ply means a thickness or layer.
|
|
| If you don't find the answer you're looking for here, please contact us. |
|

|


|
USA Giclee On Canvas, Fine Art Printing - Art Scanning & Reproductions - Handmade Oil Paintings - Custom Wood Panels, Metal Picture Framing - Block/Plaque Mountings, Large Format Dry Mounting & Lamination - Art Supplies: Stretcher Bars, Cradled Wood Panels and Artist Canvas - Collages On Canvas - Plexi/Acrylic Face Mounts - Block Acrylics, Fabric Printing, Dye Sublimation - Cityscape Skyline Prints, Resin, Photo Gifts and more...
|
|
© 2002-2025 - KeenART Media Ltd.
|
|
| |
|
